Soft Burger Buns Without Butter

My simple recipe for these Super Soft Burger Buns Without Butter will not only save you money, but homemade burger buns taste miles better than shop-bought buns. They are surprisingly easy to make too. Making your own fluffy burger buns doesn’t need to be hard. And, these are the softest homemade buns ever!
Why You’ll Love This Soft Burger Bun Recipe
- Simple to Make – You can even save your arm muscles and energy and use a stand mixer with a dough hook attachment for kneading.
- Vegan – These burger buns are made without butter, milk or eggs, making them suitable for those following a vegan diet.
- Better than Shop-Bought – You control what goes into your burger dough and they’re no more expensive to make at home than to buy either.
About This Recipe – In More Detail
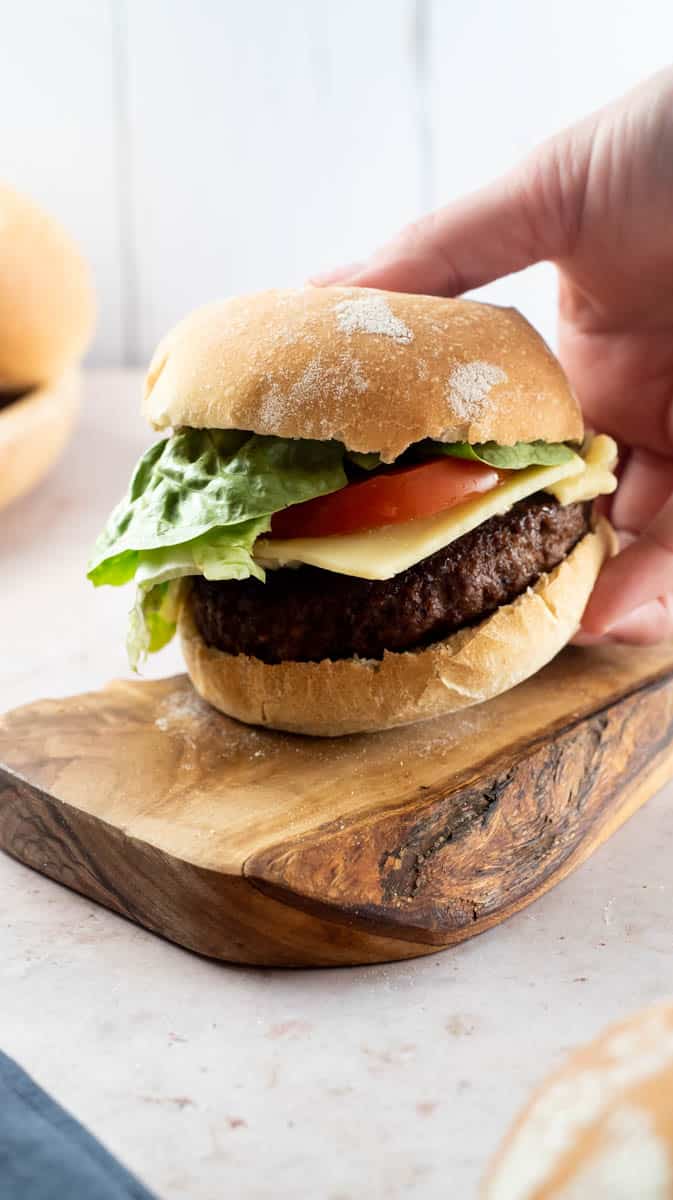
These super soft burger buns are the perfect addition to any burger night or barbecue. They’re incredibly easy to make and can be customized to your liking. Whether you like them big or small, these hamburger buns are sure to please. They also freeze well too, meaning you can make them ahead of time.
The best part about this soft hamburger buns recipe is that it’s made without butter. It makes them dairy-free and suitable for Vegans. So if you’re looking for a delicious and healthy burger bun option, these are the perfect choice.
These buns are also great for sloppy joes, picnics, and packed lunch boxes. They’re great with our Smashed Turkey Burgers, Nacho Burgers and our Fried Buttermilk Chicken Burgers too! They’re a versatile bread that can be used for a variety of dishes. So next time you’re looking for a delicious and healthy bun option, be sure to give these a try.
What Equipment Do I Need To Make Soft Burger Buns?
I recommend using the following equipment for this recipe:
- A Large Baking Tin or 2 With Raised Sides – You can use this when rising the buns and then transfer the whole thing to the oven. This will save you the fiddly job of transferring them to a separate baking tray.
- A Large, Clean Plastic Bag or Clean Cloths and Clingfilm (Plastic Wrap) – You can place the tin inside a bag when proofing the dough, or cover it with the clingfilm and a clean cloth.
- Stand Mixer with Dough Hook Attachment or Bread Maker – Of course, this isn’t a vital or necessary piece of equipment, so if you don’t have either, don’t worry! If you do have a stand mixer, you can use it to knead the dough, saving the effort of doing it by hand. You can also leave the dough to rise inside the mixer bowl to save on washing up.
- A large bowl – You’ll only need this if you do everything by hand.
- A Wooden Spoon Or Spatula – If you are doing things by hand, using a spoon or spatula to mix the dough together initially before kneading will save you becoming covered in sticky dough.
- Non-Stick Baking Paper – I recommend lining the baking tin with this as it will stop the buns from sticking to the tin and making it difficult to remove them once baked.
Ingredients
I have the ingredients you need below, including any substitutions or variations that it is possible to make.

- Strong White Bread Flour – Bread flour contains more protein that regular, all-purpose plain flour. This allows the bread rolls to have more rise and a better structure, so your end result will hold their shape much better. You can use regular strong bread flour or Manitoba flour (which has even more protein than regular bread flour).
- Dried Yeast – I recommend using an easy bake yeast for ease, since you can add it straight in with the flour. You can also substitute for Active dried yeast (mix with a little water and the sugar first and leave it for 20 minutes before adding) or Fresh yeast (which needs to be mixed in a little water). For fresh yeast you will need to use double the amount as dried yeast, so for this recipe add 24 grams.
- Salt – This is important as it helps to strengthen the gluten and enhance the flavour. Do not omit the salt in this recipe.
- Sugar – Swap out the sugar for honey if you prefer.
- Olive Oil – This gives our bread buns a softer feel as well as adding flavour. You can use extra-virgin olive oil or regular olive oil.
- Water – The water in bread dough should be lukewarm but not too hot. Using cold or hot water can kill the yeast and prevent the dough from rising. If you want to be precise, water should be around 24C or 75F.

Are Hamburger Buns Difficult To Make?
If you’ve avoided creating homemade burger buns in the past, thinking that they may be difficult to make or result in failure, I’m here to tell you that’s not the case.
Once you get used to simple bread making, you won’t look back.
I’ve kept the recipe and ingredients simple here, using olive oil in place of butter and adding in other standard bread dough ingredients; bread flour, salt, sugar and yeast.
Unlike many other hamburger bun recipes, my recipe doesn’t contain cream, butter, or egg, making it a great choice for both meat-eaters and vegans. You don’t need an enriched dough to achieve soft and fluffy buns, trust us!
You can also save time and effort by using a stand mixer with a dough attachment or bread-maker to knead your dough. But if you prefer a more traditional approach, kneading by hand works too. Don’t let the fear of failure keep you from making your own delicious soft burger buns.
How To Make Soft Burger Buns – Step By Step Guide
Step 1: Mixing the Dough
- In a large bowl (or the bowl of a stand mixer), add the flour.
- On one side of the bowl, add the yeast, and on the other side, add the salt and sugar.
- Pour in the olive oil with about 3/4 of the water.
- Begin mixing with a spatula, wooden spoon, or dough attachment on a stand mixer until the dough starts to form.
- Add more water as needed until all the flour is picked up and forms a ball.


Step 2: Kneading and Rising
- Knead the dough for about 10-15 minutes (less if using a stand mixer) until it develops a shiny skin.
- Shape the dough into a ball, seal it at the bottom, and place it in an oiled or floured bowl with the seal at the bottom.
- Cover the bowl with a clean cloth and let the dough rise for 1-2 hours in a warm place until it doubles in size.


Step 3: Preparing the Baking Tin and Shaping the Buns
- Line a large baking tin (or 2) with non-stick baking paper and flour the base.
- Uncover the risen dough and pinch off enough dough to form balls weighing around 80g (between a golf ball and tennis ball).
- Fold each ball around itself, seal it at the bottom, and coat it in flour.
- Place the dough balls in the tin, leaving space between each one to allow them to rise.
- Cover the tin with a large plastic bag, cling film, and a clean cloth.


Step 4: Final Rising and Baking
- Place the tin in a warm location and let the dough balls rise again for about an hour.
- Preheat the oven to 200°C (390°F).
- Once the buns are ready, uncover them and place the tin in the oven.
- Bake for approximately 10 minutes until the buns start to brown on top.
- Remove from the oven and transfer each bun to a cooling rack.


Step 5: Cooling and Serving
- Allow the hamburger buns to cool completely before storing or serving.
- Optionally, lightly toast the buns before filling to give them a crispy texture.
- Serve the buns with burger ingredients or fillings.
Shaping Burger Bun Dough
There is no need to use a ring or mould to shape these soft hamburger buns. If you do it right, the hamburger bun will hold its shape just fine.
When shaping the burger dough balls in your hand, make sure you have created a tight seal at the bottom. This will help the dough balls to hold their shape, as the gases created by the yeast will be sealed in. Be sure to pinch the dough balls firmly on one side and place them down with this seal facing down.

FAQ
If your burger buns have become a little hardened or stale, they’re still good to use. You can soften them up by placing them in a warm oven for a few minutes or microwave them for about 30 seconds (more if necessary) in a microwavable dish with a damp paper towel placed over the top.
This is down to personal preference, you can lightly toast burger buns before filling if you like a crispier texture to your buns. It also helps to prevent the fillings making them soggy.
The ingredients are often the same. The difference is down to the shape and size. Buns are often baked for less time than bread as bread is usually baked as a loaf and takes longer in the oven to bake all the way through.
Bread flour contains more protein than normal all-purpose flour. The purpose of protein is to help the bread dough to rise and hold its structure and shape better. For While it is possible to make bread buns from all-purpose flour, if you want the best results and fluffy bread buns, I would recommend only using bread flour to make your homemade hamburger buns.
How Do I Know When Burger Dough is Ready to Bake?
The more you make bread, the easy you will find that it becomes to tell when bread and burger dough is ready to bake.
Bread dough doesn’t follow the clock, so when you are given times in which the dough should rise, this is only ever an estimation.
There are many other factors that contribute to when the burger buns will be ready to go in the oven. This includes the room temperature (the warmer the weather, the quicker the dough will rise), the humidity and even the age of your ingredients – it is best to use dried yeast that is within the expiry date and has been opened in the past 6 months.
Of course, these variables can alter day-by-day. The best way to tell when the dough is ready to bake is to firstly watch the rise. Have the burger buns grown like the picture below?
The next test is to gently poke the dough with a clean finger. If the dough springs back straight away, leave it a little longer. If your finger leaves a little indentation in the surface of the dough, they’re ready to bake.
I recommend preparing your oven when you begin to proof the dough balls in the tin. This gives the oven enough time to reach the desired temperature, giving you the best results. Remember, the baking time for these fluffy burger buns is short. We don’t want them going into a cold oven, otherwise they won’t have time to bake all the way through.

Have I Over-Proofed My Dough?
If you happen to leave the dough for too long, you risk over-proofing the dough.
Over-proofed dough will look saggy and unstable, as it has no more rise left in it. It may deflate if you poke it.
You can still attempt to bake over-proofed burger buns. You may notice that they will not grow any more when placed in the oven and the end result may be a little flat, but they are still edible.
Pro Tips and Guidance
- Rising times can vary – In the summer, you may not need as long a rising time as you do in the winter. It also depends on the humidity and ambient room temperature too. You can check the dough by lightly pressing a finger into the top, if the indentation remains, the dough is ready. If it pops back up, give it a little longer.
- You may need more than one tin – It’s best not to pack out a single tin as the burger buns in the middle won’t cook evenly. Be sure to give the buns space between each one to allow them to bake evenly.
- Always preheat the oven – Important for bread making. Don’t put dough into a cold oven as this can affect your end result. You will find the burger buns will be dense and less fluffy.
- Scaling the Burger Bun Size – You can make bigger or smaller burger buns, depending on your requirements. If you choose to make smaller buns, the baking time shouldn’t change too much, but bigger buns may need a little longer in the oven. Try to prepare and bake burger buns of roughly the same size at any one time so they’re proofed and ready to go in the oven at the same time.

Storage
- These Soft burger buns should be stored at room temperature in a bread bag, storage bag or airtight container. They are best served fresh but will last for 2 days before they begin to become a little stale. However, you can freshen them up in the oven or toast them before using and they’ll still be good for a few more days.
- You can also freeze burger buns for up to a month. Keep them in an airtight container in the freezer and defrost them by placing in a warm oven for around 5 minutes or so.
How to Serve Soft Burger Buns
While these soft burger buns are the ultimate burger bun for Barbeques and burger nights, they can be used for lots of things.
- You can use these buns as sandwich rolls for picnics and packed lunches. Fill them with any ingredients you like.
- They are great for sloppy joes.
- You can make them into sliders.
- You can use them as soft dinner rolls.
- Try this Jalapeno Mayo or This Jalapeno Burger Sauce on top of your burgers for the ultimate spicy sauce!
- Serve them filled alongside these Sweetcorn Ribs for a great BBQ accompaniment.
- Another great burger sauce is this Roasted Garlic and Herb Dip, try it with beef or chicken burgers.
Check Out These Bread Recipes

Parmesan and Oregano Bread Rolls
If you love a Subway, these bread rolls will save you heading out and getting one. They taste better than the shop-bought ones and you can fill them any way you want.


Nandos Style Portuguese Buns – Papo Seco Bread Rolls
These delicious bread rolls are so versatile. Steamed in the oven to bake, they are soft and fluffy inside with a crunchy outer layer.

Soft Burger Buns
Ingredients
- 500 g Strong White Bread Flour
- 12 g Dried Active Yeast
- 12 g Salt
- 1 tbsp Caster Sugar
- 30 ml Olive
- 320 ml Water, Luke Warm
Instructions
- In a large bowl, mix the flour, yeast, salt, and sugar.
- Add the olive oil and 3/4 of the water.
- Mix with a wooden spoon or spatula, or with the dough attachment on a stand mixer.
- You may need to add a little less water or a little more depending on how your dough feels. Add the water until all of the flour has been collected up into the dough ball. The dough should be sticky at this stage but not too wet.
- Knead the dough for 10-15 minutes, until it forms a shiny skin.
- Form the dough into a ball and seal the bottom.
- Oil or flour the bowl and place the dough ball in it.
- Cover the bowl with a clean cloth and let the dough rise in a warm place for 1-2 hours, or until it doubles in size.
- Prepare a baking sheet by lining it with non-stick baking paper and a generous sprinkling of flour.
- Uncover the risen dough and pinch off enough dough to create 80g balls.
- Roll each ball into a smooth sphere, then seal the bottom.
- Roll the balls in flour and place them on the baking sheet, leaving space in between each one.
- Cover the baking sheet with plastic wrap or a clean cloth and let the buns rise for an hour more.
- Preheat the oven to 200C (390F).
- Bake the buns for 10-15 minutes, or until they are golden brown.
- Remove from the oven and let them cool on a wire rack.
- Serve the buns warm or at room temperature, filled with your favourite burger ingredients.
Video
Recipe Notes
- Rising times can vary – This is due to the ambient temperature of the room, as well as the time of year and the amount of humidity present. It is best to be visual and check the dough by eye, rather than by time.
- You may need more than one tin – Depending on how large a tin you are using. The bread rolls need space in between to bake evenly. Don’t overpack the tin.
- Always preheat the oven – It will affect the end result if you put the burger buns into a cold oven.
- Changing the bun sizes – You can scale your burger buns up or down depending on the size you’d like them to be. Just be sure to prepare and bake buns that are roughly the same size as each other so they are ready to bake at the same time and require the same amount of baking time. Be aware that larger buns may need a little longer in the oven to bake all the way through.


Loved this recipe! They were amazing as the buns for my cheeseburgers that I made. Thanks for sharing, love your site and YouTube channel!
Bless you Annabelle, that’s lovely to hear and I’m so pleased you enjoyed this recipe :)