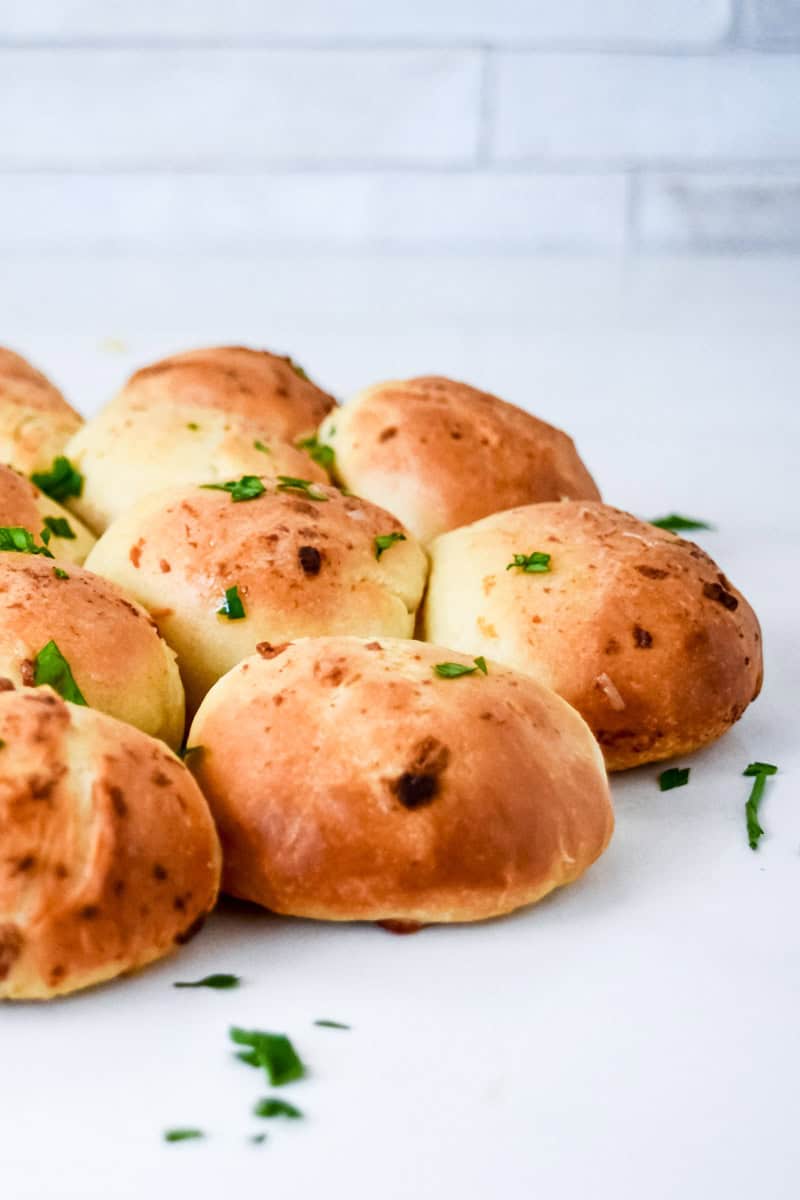
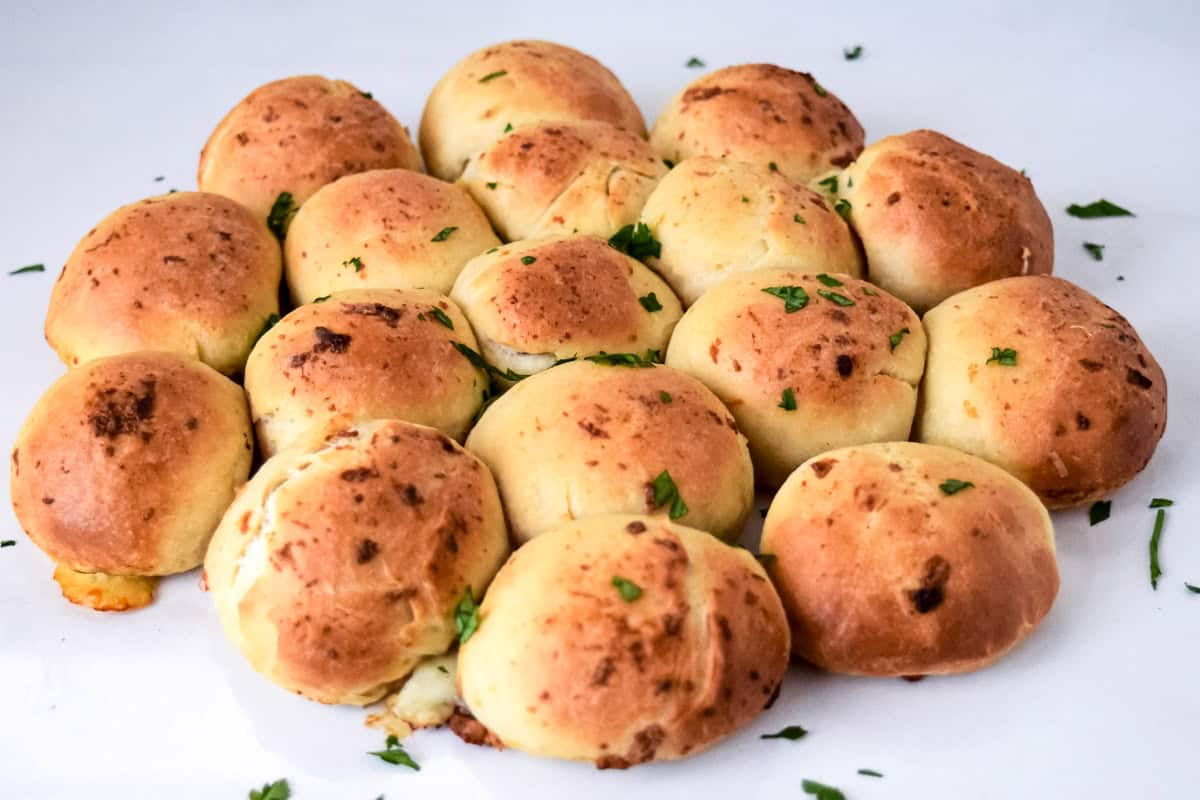
Cheesy Garlic Mozzarella Doughballs
Having a night in, watching a film and feasting on these mozzarella stuffed garlic dough balls. They’re made from scratch and great for sharing!
Recipe Overview
Prep Time:
20 MINUTES (plus rising time)
Cook Time:
15 MINUTES
Why You’ll Love Mozzarella Doughballs
Perfect for Sharing: Baked in a circle, they make an ideal centrepiece for parties, family dinners, or movie night.
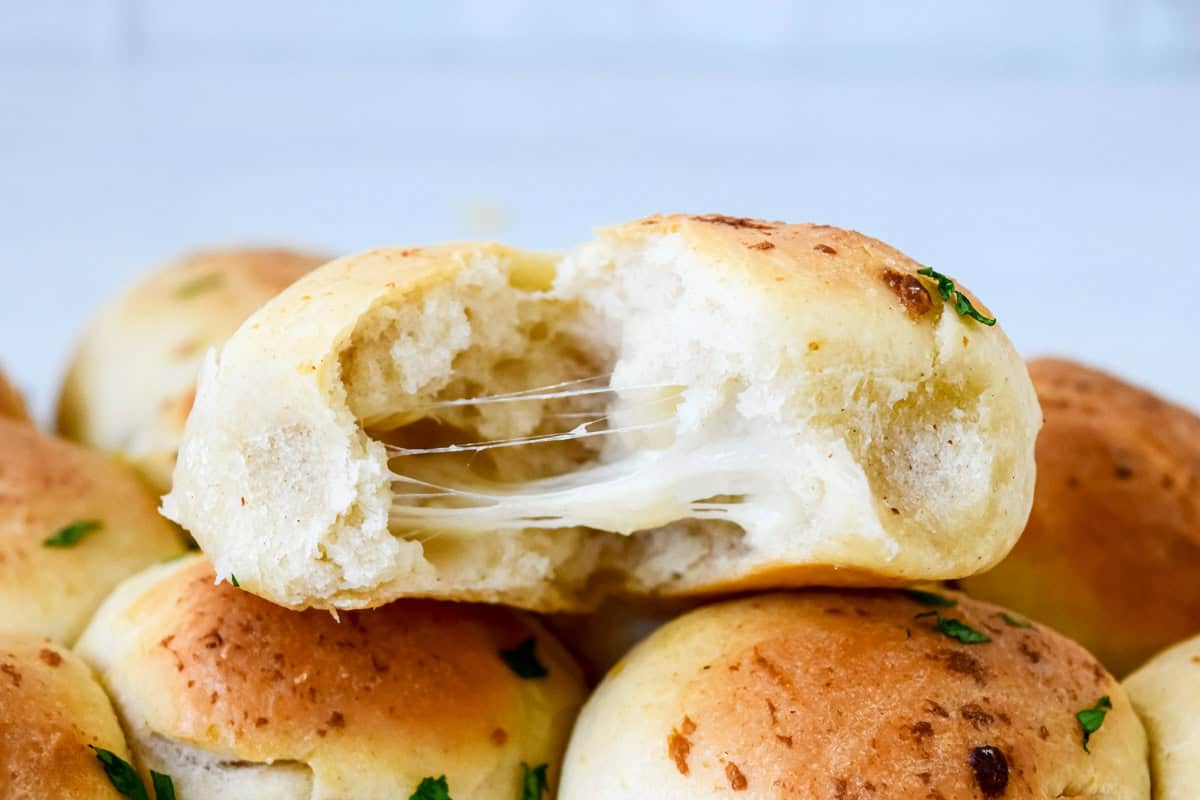
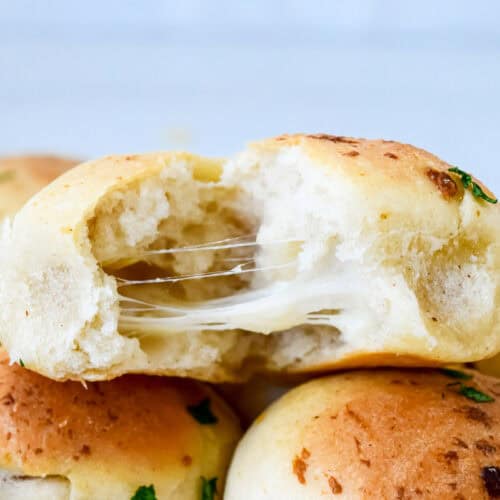
Melty Cheese Centre: Each doughball is stuffed with gooey mozzarella that melts as it bakes. They’re perfect for tearing apart and dipping.
Restaurant Quality at Home: If you like those Pizza Express doughballs, I guarantee you’ll love these.
Rebecca Foxley’s Personal Notes About Cheesy Mozzarella Doughballs

“There are days when you’re super busy, rushing here and there and everywhere and burning plenty of calories. It’s those days when I can justify munching on these cheesy stuffed doughballs and smothering them in garlic butter. Mmmm garlic butter, I am a huge fan! But this melty cheese middle. This is like heaven for me in dough form! “
When we visit a chain restaurant like Pizza Express, doughballs are always on our list to order. But, when you can make them at home, you can enjoy soft, fluffy doughballs filled with cheese and you won’t even have to go out of the front door.
Stuffed doughballs are particularly great for those family movie nights, when you want to curl up and relax indoors. They make great sharing food for parties too! And if you love cheesy bites, go try these Mac and Cheese Bites or these Chilli Cheese Bites next.
If you aren’t as big a cheese freak as I am and you want plain doughballs, I won’t judge. Just leave the mozzarella out and voila! They will still be yummy either way. You can even try creating your own version of stuffed doughballs with other ingredients hidden in the middle. Some of my favourite doughball fillings include a combination of pepperoni, jalapenos and cream cheese or Pesto, tomato and Parmesan.
If you’re sharing with friends and you are feeling fancy. You can arrange these stuffed doughballs into any shape you like, shape them into a heart, make them smaller, make one huge doughball, whatever you like! Although I am half joking about the one doughball thing.
There’s something so satisfying in making recipes from scratch. Especially when it’s so simple and the end result is something delicious. Whilst the dough is rising you can be getting on with other things which is always a plus when you’re a busy mumma and the house needs cleaning for the 50 millionth time in a day!
Equipment Needed:
- Large Mixing Bowl: To create the dough. You can also use the same bowl to store the dough as it rises. Use one that allows the dough to grow without spilling over the top.
- Measuring Jug or Cup: For the water.
- Wooden Spoon or Dough Scraper: Saves you getting doughy hands as you stir and mix the ingredients together.
- Sharp Knife or Dough Cutter: For cutting the mozzarella and dividing the dough.
- Baking Sheet: Lined with baking paper (parchment paper) for baking.
- Clingfilm or Large Plastic Bag: To loosely cover the doughballs during the second rise.
- Small Bowl: For mixing the garlic butter.
- Garlic Crusher or Fine Grater: To crush or grate the garlic for the butter topping.
- Pastry Brush: For brushing the warm doughballs with garlic butter.
Ingredients:
- Strong White Bread Flour: Using a bread flour for this recipe helps the dough to maintain it’s structure. I recommend a white flour as opposed to a wholemeal flour. You can add in some wholemeal flour but the doughballs will have a more dense texture. Don’t use plain flour in this recipe, as the balls won’t hold their shape as well when rising.
- Dried Yeast: I use a fast action yeast also known as an easybake yeast which you can add straight to the flour. Other types of yeast such as fresh yeast (which you will need to add more of) and Active dry yeast, will need to be activated before adding in to the flour.
- Fine Sea Salt: Helps enhance the flavour, regulates the dough rise and strengthens the dough.
- Sugar: I use a white caster sugar, but you can also use granulated.
- Garlic Granules: Adds a subtle garlic flavour to the dough itself.
- Olive Oil: I use a mild olive oil but you can also use extra virgin olive oil.
- Butter (softened): I use unsalted butter to help regulate the amount of salt in the dough.
- Lukewarm Water: For accuracy if you’re new to breadmaking, the water should be around should be around 24°C to 32°C (75°F to 90°F). If you have a cool room, a little warmer is fine, but don’t exceed 46°C (115°F).
- Mozzarella Cheese (block): I use cooking mozzarella as it doesn’t contain much liquid, so the doughballs won’t turn soggy. However, if you only have fresh mozzarella to hand, cut it into small cubes and allow it to drain in a sieve for a few hours before using.
Substitutions and Additions:
Wondering if you can substitute or add an ingredient? Here, I will tell you if that’s possible.
- You will notice in the recipe for dough balls I use garlic granules. In the herb and spice aisle in your supermarket you may notice different types of dried garlic and wonder what the difference is. Garlic powder and garlic granules are essentially the same thing, dried garlic. The only difference between the two is the granule size and either is fine to use for this recipe. Garlic salt on the other hand is mostly salt with a hint of garlic flavour to it. I don’t recommend using garlic salt here as you will be increasing the salt level and decreasing the already subtle garlic flavour in the dough. The reason for using dried garlic instead of fresh garlic in this recipe for dough balls is because the flavour will spread better throughout the dough rather than having pockets of intense garlic flavour with pieces of fresh garlic. There are certain recipes in which fresh garlic is better than the powder, but not this particular one. If you have no other option that to use fresh garlic, you can either omit the garlic in the dough or mince the fresh garlic and spread throughout the dough when you knead it.
Step-By-Step Guide In Detail


Frequently Asked Questions
Why not? You can use whatever cheese you like to stuff these dough balls. But the meltier the better in my opinion. Some options to try would be cheddar, blue cheese, camembert, provolone or fontina.
If you need to freeze them, I would recommend doing so after you have created your balls and stuffed with the filling. When you want to use them, arrange them on a baking tray, sprinkled with fine semolina and follow the instructions for the second rise. Be aware that they will take much longer as they will need to defrost and warm slightly to begin the second rise.
Sure, be as inventive as you like here, but be aware that some fillings might seep out or make the doughballs a little soggy. You can even flavour them differently in the same serving and have a little surprise with each bite!
They are best when eaten fresh and warm but if you’d like to make them ahead, I would recommend covering them in foil and placing in a warm oven for at least 10 minutes to warm up again. Be aware that if you are using a meat based filling and reheating the dough balls, that they are piping hot in the middle.
Mastering This Recipe – Expert Tips
- I recommend using a block of cooking mozzarella in this recipe, rather than fresh. Fresh mozzarella has more liquid content and can make your recipe turn out soggy. If you want to use fresh mozzarella, I recommend cutting it into cubes, sprinkling with a little salt and leaving it for at least an hour to drain away some of the liquid content before using it.
- When you create your little balls of dough and envelope the cheese. I recommend to put them with the seal facing down on the baking tray, this tip will help keep the air in your dough and not allow it to escape. It also gives the balls a nice round shape when they are finished.
Storing Mozzarella Doughballs
- Storing Leftovers: Store in an airtight container in the fridge for 2-3 days. Warm them in the oven for a few minutes before serving.
- Freezing Before Baking: You can freeze the shaped, unbaked doughballs (before the second prove) on a baking tray until solid, then transfer to a freezer bag. Freeze for up to 1 month. Defrost at room temperature, then allow them to rise before baking as per the instructions.
- Freezing After Baking: Leave the garlic butter off and wrap tightly and store in the freezer for up to 2 months. You can then pop them in the oven covered with foil for about 10 minutes to warm through. You can then give them a few minutes uncovered to crisp up.
Cheesy Garlic Mozzarella Doughballs
Ingredients
- 300 g Strong White Bread Flour
- 7 g Dried Yeast
- 0.5 tsp Fine Sea Salt
- 0.5 tsp White Sugar
- 0.5 tsp Garlic Granules
- 1 tbsp Olive Oil
- 30 g Butter, softened
- 160 ml Lukewarm Water
- 60 g Block of Mozzarella Cheese
For the Garlic Brush
- 30 g Butter, melted
- 2 Cloves of Garlic
Instructions
- Measure the strong white bread flour into a large mixing bowl.
- Add the dried yeast to one side of the bowl. Add the salt, sugar, and garlic granules to the opposite side, keeping them separate from the yeast.
- Add the olive oil and softened butter to the bowl.
- Gradually add the lukewarm water while mixing until the dough comes together into a soft ball. Stop adding water once the dough forms, although you may need a small extra splash if the dough feels dry.
- Tip the dough onto a lightly floured surface and knead for about 10 minutes until it becomes smooth, glossy, and stretchy.
- Place the dough into a lightly oiled bowl, cover with clingfilm, and leave somewhere warm to rise for about 1 hour, or until doubled in size.
- Tip the risen dough onto a floured surface and gently knock it back to remove excess air.
- Weigh the dough and divide it into portions of roughly 30 g each.
- Cut the mozzarella into small cubes and add around 3 g of cheese to the centre of each dough portion.
- Fold the dough around the cheese and roll into a smooth ball, sealing the cheese inside.
- Arrange the dough balls onto a lined baking sheet in a circle, leaving a small gap between each one. You should have around 17 dough balls.
- Place the baking sheet inside a large plastic bag or loosely cover with clingfilm and leave to rise again for 30 minutes.
- Preheat the oven to 200°C (390°F).
- After the second rise, remove the baking sheet from the bag and bake the dough balls for 10–15 minutes until golden.
- While the dough balls are baking, melt the butter for the garlic brush and finely grate or crush the garlic.
- Mix the melted butter and garlic together.
- Remove the dough balls from the oven and immediately brush them generously with the garlic butter. Serve them immediately while warm.
Recipe Notes
- Use Block Mozzarella, Not Fresh: Fresh mozzarella releases more moisture as it bakes, which can make the centres soggy. A block of mozzarella holds its shape better for stuffing. If you wish to use fresh cheese, cut it into cubes and drain in a sieve for a few hours before use.
- Make Them Bigger or Smaller: You can divide the dough into fewer, larger balls for a sharing tear-and-share style bread, or smaller bite-sized ones for party food. Just adjust the baking time slightly depending on the size.
- Store leftovers in the fridge for 2-3 days. Warm up in the oven before serving.


My family of 5 devoured these and were sad that I did not double the recipe! Delicious!
Can I use premade dough? Like store bought?
Hi Sandra,
Store-bought dough might contain slightly different components and ratios to this recipe here. However, although I cannot guarantee the results, you should still be able to create your own version of these doughballs with a store-bought dough, just be sure to allow the dough to rise sufficiently before baking.
Tried this with my 9yr old daughter who was begging me to make cheesy garlic bread balls. I thought we could try this instead and it worked out really well.
Have a couple that we didn’t cook yet so chucked it into a container into the freezer for another time.
Also will try with cheddar cheese instead of mozerella
I’m really pleased you like them! I’d love to know how they turn out with cheddar cheese so let me know when you make a version like this.
Great recipe! My family loved it see??
Glad to hear you and your family enjoyed it! :)