Classic Old School Cornflake Tart Tray Bake Recipe

A British School Throwback recipe that’s guaranteed to ignite your nostalgia. This classic cornflake tart tray bake made with a shortcrust pastry base and filled with raspberry jam and crunchy cornflakes is easy to make and will introduce the kids to how school dinners used to be.

What Makes This Recipe Great!
- A Traditional Retro British Recipe – Transport yourself back to school with this delicious cornflake tart.
- Made from Scratch – I have made everything from the beginning, including the shortcrust pastry case.
- Perfect for a Budget – With easy to find, cost-effective ingredients that will give you a sweet treat, without breaking the bank.
About This Recipe – In More Detail
Some of the best recipes, are the ones that remind you of childhood. These kind of throwback recipes like these Coconut Ice Bars stick with you as a reminder of how you grew up and have a way of transporting you back to those childhood days with every bite. This classic English dessert is perfect for taking a trip down memory lane.
One of my favourite school-time traditional British recipes is this jam-filled cornflake tart. With a golden shortcrust base, a sweet, sticky filling and crispy cornflake topping, this recipe is guaranteed to become a firm, family favourite. It’s easy to make and a good dessert recipe to try, even if you’ve never heard of an Old School Cornflake tart before.
I love breakfast cereal based desserts. Don’t forget to check out this Mars Bar Tray Bake as another classic alternative using breakfast cereals. Or these Cornflake Brownies that have a classic cornflake cake topping!
Cornflake tarts are often found in a round cake form. However, I have chosen to make this a cornflake tray bake, so that you can slice up the portions with ease and give you a slight variation on the classic. You can still use a fluted tart tin if you prefer the original shape. See our equipment needed section for the size required.
If you’re looking for some more recipes that use jam, check out these Jam Filled Doughnuts next!

Equipment Needed To Make A Classic Cornflake Tart
- 20x20cm (8×8 inch) Square Baking Tin – I use this to bake and shape the cornflake tart. If you’d prefer a more traditional shape, you can use a loose-bottomed tart tin that is fluted and is 20cm (8 inches) in size.
- Large Saucepan – To Melt the ingredients on the stovetop.
- Parchment Paper (Baking Paper) – To line the baking tin.
- Baking Beans – These help to weigh the shortcrust pastry down in the tin as it bakes and gives the best results. If you do not have any baking beans to hand, you can use uncooked rice, dried beans, clean washed coins or a smaller tin that fits inside the tin instead.
- A large bowl and Wooden Spoon or Spatula – To mix the topping ingredients in.
- Food Processor (optional) – For ease, you can use a food processor to combine the flour and butter for the pastry but it isn’t a necessity.
- Rolling Pin – To roll out the pastry.
- Stand Mixer (optional) – Instead of a large bowl and mixing by hand, you can choose to mix everything together for the topping in a stand mixer with a paddle attachment. Again, this is optional and you can do this by hand if you do not have a stand mixer at home.
Ingredients Needed For This Cornflake Tart Tray Bake

- Corn Flakes – The star ingredient in the cornflake tray bake tart. If you want to switch things up a bit, you can also use Crunchy Nut Cornflakes for a little twist.
- Plain Flour (White, All Purpose) – This is the base for the shortcrust pastry. I don’t recommend substitutions here but if you don’t want to make your own shortcrust pastry, you can buy it ready-made.
- Unsalted Butter – I use this for both the sticky coating for the cornflakes and the pastry base. Stick with an unsalted version as this is a sweet recipe.
- Icing (confectioners) Sugar – This fine sugar adds a little sweetness to the pastry base.
- Egg Yolk – I add an egg yolk to our pastry to give it richness and colour. But if you prefer an eggless pastry you can substitute it with a little more water. Only add enough water to the pastry to make it come together and rolled, otherwise the pastry will be flimsy when baked.
- Raspberry or Strawberry Jam – You can use seeded or seedless varieties of jam. Or try a different flavour such as blackberry, rhubarb or gooseberry to switch it up a bit. Feel free to experiment with your own choice of jam if you wish.
- Golden Syrup – This sweet, sticky syrup is the glue that holds the crunchy cornflake topping together. You can even make your own or try one of the alternatives listed below.
- Light Brown Soft Sugar – I add a little sugar in with the melted topping ingredients for that extra caramel flavour. Using a different sugar will give a different taste result so we recommend sticking with this type of sugar if you can.
- Note: If you prefer to buy the pastry dough, rather than have a homemade shortcrust pastry, exclude all the ingredients for the pastry in the list. You can find ready-rolled shortcrust pastry in most supermarkets.

Alternatives To Golden Syrup
If you’re from the UK, golden syrup is readily available in most supermarkets. However, it isn’t always something you can find in other countries quite so easily.
For this reason, you can substitute it with honey, corn syrup or maple syrup. All options will give a slightly different flavour to this classic recipe here but are sticky and sweet enough to hold the cornflake tart together well. You can also make your own golden syrup too!
Step-By-Step Guide- How To Make A Classic Cornflake Tart Tray Bake
Step 1: Make the pastry
- Cube the butter straight from the fridge into small pieces or chunks and add them to a large bowl or food processor.
- Add the flour and icing sugar.
- Rub the ingredients together using your fingers or combine them using a food processor until you create a texture of breadcrumbs.


Step 2: Bring the pastry together
- Add the egg yolk straight from the fridge with 1 tsp of water.
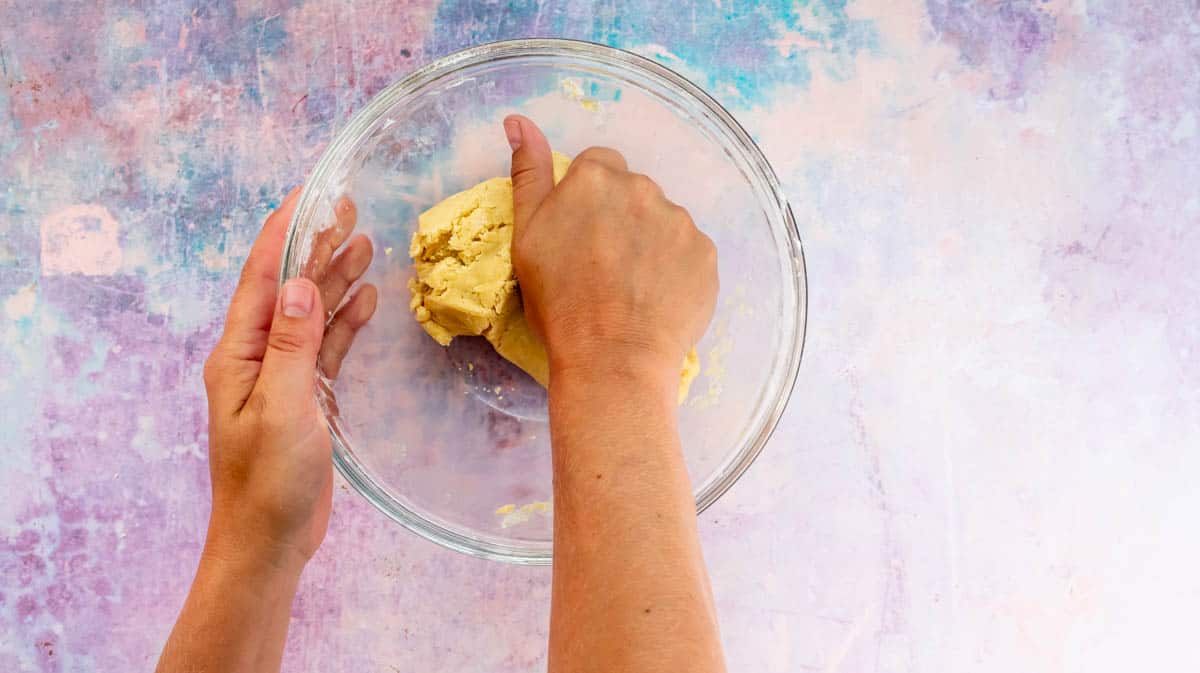
- Gently bring the pastry together to form a ball using the heel of your hand. Try to use the coldest part of your hand. You can cool your hands with cold water before kneading on hot days.
- If needed, add a little more water at this point, but be cautious not to add too much. The pastry should form a ball that holds together.

Step 3: Roll out and line the tin
- Place the pastry ball on a lightly floured surface and roll it out to about 1cm (1/2 inch) thick in a rough square shape that fits into your tin. Make sure it is large enough to go up the sides of the tin.
- Line the tin with baking paper and grease it with a little butter, leaving a slight overhang of baking paper for easy lifting later.
- Carefully place the rolled out pastry into the tin, ensuring you press it into the corners.


Step 4: Pierce, chill, and preheat
- Pierce the pastry case all over with a fork to prevent it from rising and creating air pockets.
- Cover the tin with cling film or a clean cloth and place it in the fridge for at least 30 minutes to chill and rest.
- Preheat the oven to 170C (340F).
Step 5: Blind bake the pastry
- Remove the chilled pastry from the fridge and remove the clingfilm.
- Place a layer of baking paper into the tin, completely covering the pastry, and add baking beans in an even layer.
- Bake the pastry case in the preheated oven for 15 minutes.
- Remove the pastry case from the oven and carefully take out the baking beans and the layer of baking paper. Use the baking paper to lift the whole thing out.
- Return the pastry to the oven and bake for another 5-10 minutes until it becomes a light golden brown colour.


Step 6: Cool the pastry case
- Remove the shortcrust pastry from the oven and cut away any excess pastry that overhangs the tin using a sharp knife.
- Allow the pastry case to cool in the tin while you prepare the rest of the ingredients. Keep the oven on at this stage.
Step 7: Prepare the filling
- In a pan, add the soft brown sugar, butter, and golden syrup.
- Melt everything together gently over low heat until smooth and melted. Stir frequently to prevent burning.


Step 8: Coat the cornflakes and layer the tray bake
- Place the cornflakes into a large bowl and add the melted mixture.
- Fold everything together to coat the cornflakes entirely.
- Using a spoon, layer the jam into the pastry case and smooth it out evenly with the back of the spoon.
- Pour in the cornflake mixture and press it down gently, removing any large air pockets. Spread the cornflake mixture evenly over the tray bake.


Step 9: Bake and cool
- Return the cornflake tray bake to the oven and bake for another 5-7 minutes until the topping becomes golden and toasted.
- Remove the tray bake from the oven and allow it to cool until warm before lifting it from the tin, slicing, and serving.

What is a Cornflake Tart?
For those of you who didn’t grow up in Britain or are too young to remember, a slice of Cornflake tart was often served at school for a sweet, lunchtime dessert during the 1970s and 1980s.
You will find its origins dating back to post-war Britain in the 1940s era, with old school cornflake tarts appearing in recipe books around this time.
A cornflake tart consists of a shortcrust pastry base, which is baked in the oven until it becomes golden brown. The pastry is then topped with a layer or strawberry or raspberry jam.
The crunchy, crispy topping is made from Cornflakes that have been generously coated in a melted mixture of golden syrup, sugar and unsalted butter, which is pressed onto the top of the tart and then toasted in the oven for a few minutes, creating a simple to make dessert recipe that can be served with custard, thick cream or ice cream. Alternatively, you can choose to enjoy it simply on it’s own.
Sometimes, you may mistakenly hear this old school recipe being confused with a Cornflake Cake. Cornflake cakes are another classic recipe that is more commonly chocolate based, without jam and sometimes made with added ingredients such as marshmallows, dried fruit and even Mini Chocolate Eggs during Easter, so the two cornflake based recipes are quite different.

FAQ
Cornflake tart is a British recipe that was most popular throughout the 1960s and 1970s.
Yes you can, while the flavours will be slightly different in the end result. You can use corn syrup or honey in place of golden syrup, or even try making your own at home.
Custard is the classic accompaniment to a slice of Cornflake Tart, but you can also serve it up with thick cream or ice cream.
Pro Tips and Guidance
- Keep things cold for the pastry – To produce the best flaky pastry base, it’s important to use the butter and egg yolk straight from the fridge. If the weather is hot you may also wish to chill the flour and sugar too. When working the pastry, try to use the heel of your hand only when kneading (which is the coolest part).
- Don’t omit the chilling time – When making shortcrust pastry, it’s important that it goes into the oven cold. The best way is to roll out the pastry and shape it into the tin before covering it and chilling in the fridge for at least 30 minutes.
- Don’t overmix the pastry – Overmixing the shortcrust pastry will add heat to the ingredients and make for a less flaky pastry that is firmer and dense.
- Allow the tart to cool completely – Before attempting to lift the cornflake tray bake from the tin, allow it to cool completely, otherwise you may find that it crumbles and falls apart.
- Want to make mini cornflake tarts? – It’s totally possible to make these into individual mini cornflake tarts by using smaller tart tins. The pastry will be cooked in the same way for the same amount of time.

Storing A Cornflake Tart
- Storage: This cornflake tray bake is best kept in the fridge in an airtight container to prevent it from going soft and too sticky. It will keep in the fridge for up to 4 days. You may find that the longer you leave it, the softer the tart will become so it is best eaten as soon as possible.
- Freezing: You can freeze a Cornflake tart tray bake but it will need to be wrapped well to avoid freezer burn or the tart pastry from becoming soggy. You can keep it in the freezer for up to 3 months.
- Defrosting: Defrost it in the fridge for a few hours or overnight before serving.
- Reheating – To serve the cornflake tray bake warm, you can wrap the slices in foil and warm gently in the oven for 5 minutes.
Check Out These Other Nostalgic British Recipes

Often served in British tea rooms and cafes, these easy to make, no bake delights are sure to please, especially if you love Mars Bars.

Just a few simple ingredients are needed to make the best coconut ice which tastes just like the inside of a Bounty Bar. There’s no need for baking either.

Not so readily available in the UK these days, these classic London Cheesecakes are sure to whisk you back to childhood if you grew up around London or in the South.
Download your Free US/UK Conversion Kit
+ Bonus Baking Tin Converter!


Classic Old School Cornflake Tart Tray Bake Recipe
Ingredients
For the Shortcrust Pastry:
- 200 g Plain White All Purpose Flour
- 100 g Unsalted Butter, chilled
- 80 g Icing Sugar
- 1 Large Egg Yolk, chilled
- 1 tsp Water
For the Filling:
- 130 g Raspberry or Strawberry Jam
- 30 g Light Brown Soft Sugar
- 130 g Golden Syrup
- 50 g Unsalted Butter
- 100 g Cornflakes
Instructions
- Firstly, we need to make the pastry. Cube the butter straight from the fridge into small pieces or chunks and add to a large bowl or food processor if you are using one.
- Add the flour and icing sugar and rub together using your fingers or combining the ingredients using a food processor until you create a texture of breadcrumbs with the ingredients.
- Add the egg yolk straight from the fridge with 1 tsp of water and bring the pastry together gently to form a ball using the heel of your hand (the coldest part) where possible. You can also cool your hands with cold water before kneading on hot days.
- You may need to add a little more water at this point but don't add too much, otherwise the pastry will become too sticky. Just enough water to form a ball that holds together.
- Place the pastry ball on a lightly floured surface and roll it out to about 1cm (1/2 inch) thick in a rough square shape that fits into your tin. Be sure to make it big enough that it goes up the sides of the tin.
- Line the tin with baking paper and grease with a little butter. Be sure to create a slight overhang from the baking paper for easy lifting at the end.
- Place the rolled out pastry into the tin, ensuring you press it into the corners.
- Pierce the pastry case all over with a fork (this prevents it from rising and creating air pockets underneath it as it bakes).
- Cover the tin with clingfilm or a clean cloth and place it in the fridge for at least 30 minutes to chill and rest.
- Preheat the oven to 170C (340F).
- Remove the rested pastry from the fridge and remove the cling film.
- Place a layer of baking paper into the tin over the pastry covering it completely and add the baking beans in an even layer.
- Place the pastry case in the oven to bake for 15 minutes.
- Remove the pastry case from the oven and take out the baking beans and the layer of baking paper. Be careful as the beans will be hot! It is best to lift the whole thing out using the baking paper here.
- Return the pastry to the oven and bake for another 5-10 minutes until it becomes a light golden brown colour.
- Remove the shortcrust pastry from the oven and cut away any excess pastry that overhangs the tin using a sharp knife.
- Allow the pastry case to cool in the tin while you prepare the rest of the ingredients. Keep the oven on at this stage.
- Add the soft brown sugar, butter and golden syrup to a pan and melt together gently over a low heat until everything is smooth and melted. Take care not to burn the mixture by stirring it frequently.
- Place the cornflakes into a large bowl and add the melted mixture. Fold everything together to coat the cornflake entirely.
- Using a spoon, layer the jam into the pastry case and smooth it out evenly using the back of the spoon.
- Pour in the cornflake layer and press it down gently, being careful not to crush the cornflakes too much. Just press down enough to remove any large air pockets and spread the cornflake mixture evenly over the tray bake.
- Return the cornflake tray bake to the oven and bake for another 5-7 minutes, creating a golden, toasted topping.
- Remove the tray bake from the oven and allow it to cool until warm before lifting it from the tin, slicing and serving.
Recipe Notes
- Keep ingredients cold: Use chilled butter and egg yolk for flaky pastry. Chill flour and sugar in hot weather. Use the cool part of your hand when kneading.
- Don’t skip chilling time: Roll out and shape the pastry, then chill for at least 30 minutes before baking for best results.
- Avoid overmixing: Don’t overmix pastry to maintain a flaky texture.
- Allow cooling: Let the cornflake tart cool before removing from the tin to prevent crumbling.


amazing
wonderful